

Deploying to Google App Engine Using Github Actions


Table of contents
What is CI/CD?
CI and CD stand for continuous integration and continuous delivery/continuous deployment. In very simple terms, CI is a modern software development practice in which incremental code changes are made frequently and reliably. Automated build-and-test steps triggered by CI ensure that code changes being merged into the repository are reliable. The code is then delivered quickly and seamlessly as a part of the CD process. In the software world, the CI/CD pipeline refers to the automation that enables incremental code changes from developers’ desktops to be delivered quickly and reliably to production.
Google App Engine is a fully managed, serverless platform for developing and managing applications at scale. With App Engine, the developer does not need to worry about the infrastructure needed to deploy the application and only focuses on his code while App Engine handles the deployment.
When you combine Google App Engine and Github Actions, it provides a seamless deployment process.
In this article, we will explore how to automate the deployment of a React and Java application to Google App Engine using GitHub Actions.
Step 1: Setting Up Your Google Cloud Project
Before we begin, you should have your Google Cloud project set up with App Engine API enabled. Take note of your Project ID as you will need it later.
Step 2: Configuring Github Secrets
For us to authenticate Google App Engine with GitHub Actions, we need to pass it credentials and these credentials should be stored using Github secrets.
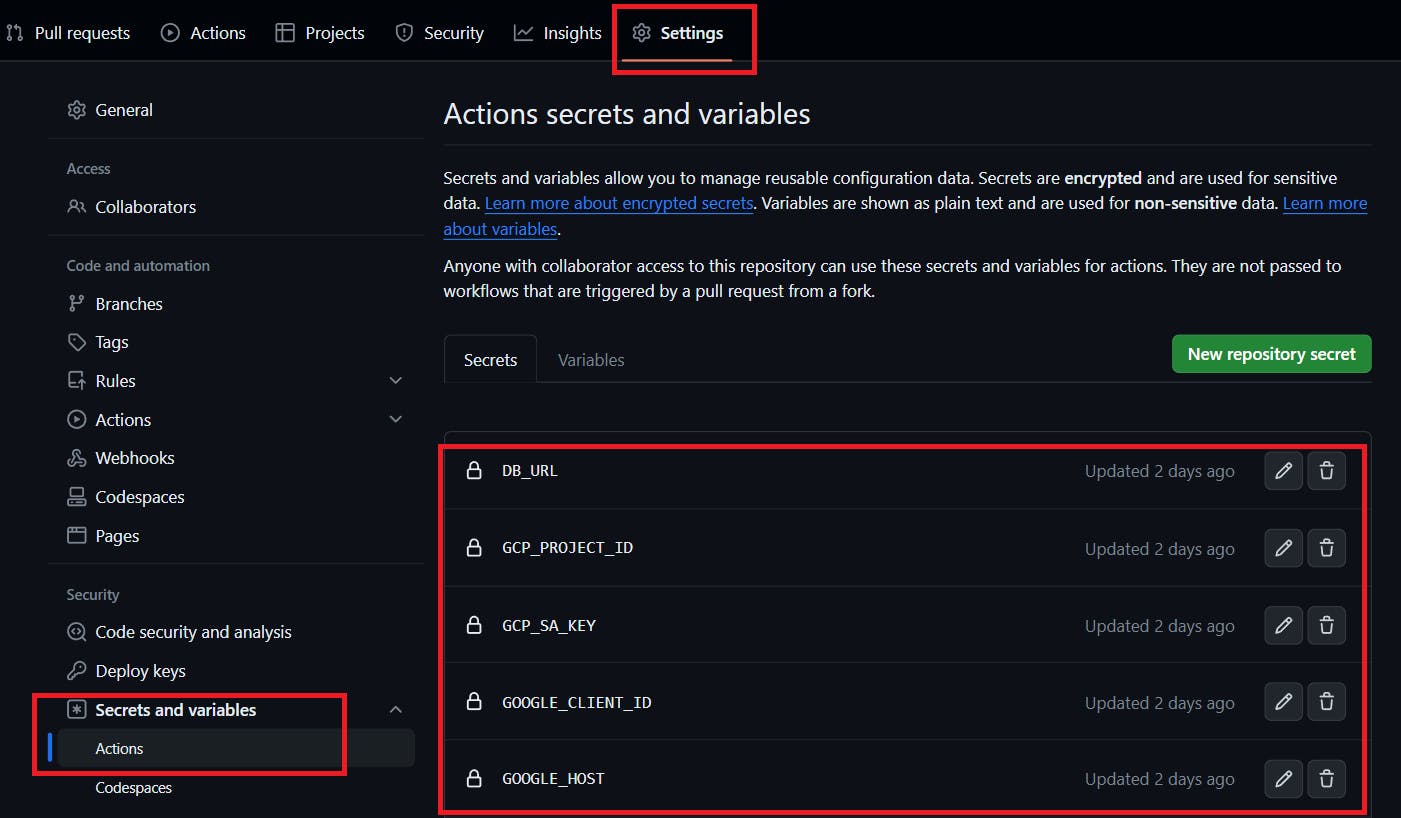
Adding Secrets to Github
In your GitHub repository, go to
Settings.Under
Security, find and selectSecrets and Variables.Click on
Actions.Click on
New repository secret.Name your secret
GCP_SA_KEYand paste the content of your Google Cloud service account key JSON file.Add another secret named
GCP_PROJECT_IDand set it to your Google Cloud project ID.Add any other additional secret you need.
NB: The React Application only needs the
GCP_PROJECT_IDandGCP_SA_KEY. All other secrets are for the Java Application
Step 3: Writing the GitHub Action Workflow (React App)
Create a .github/workflows/deploy.yml file in the root of your repository with the following content:
name: Deploy and Test Workflow

on:
  push:
    branches:
      - dev
  pull_request:
    branches:
      - dev

jobs:
  test:
    if: github.event_name == 'pull_request'
    runs-on: ubuntu-latest
    steps:
      - name: Checkout repository
        uses: actions/checkout@v2

      - name: Clear npm cache
        run: npm cache clean --force

      - name: Install dependencies
        run: npm install

      - name: Run tests
        run: npm test

  deploy:
    if: github.event_name == 'push'
    runs-on: ubuntu-latest
    steps:
      - name: Checkout repository
        uses: actions/checkout@v2

      - name: Setup Google Cloud CLI
        uses: google-github-actions/setup-gcloud@v1
        with:
          project_id: ${{ secrets.GCP_PROJECT_ID }}
          service_account_key: ${{ secrets.GCP_SA_KEY }}
          export_default_credentials: true

      - name: Install dependencies and build
        run: |
          npm install
          npm run build

      - name: Deploy to Google App Engine
        uses: google-github-actions/deploy-appengine@v0.2.0
        with:
          deliverables: app.yaml
          project_id: ${{ secrets.GCP_PROJECT_ID }}
          credentials: ${{ secrets.GCP_SA_KEY }}
          promote: true
          version: v1
This YAML file defines a GitHub Actions workflow with two jobs:
test: This job installs the project dependencies and runs tests. It triggers on pull requests to thedevbranch.deploy: This job installs dependencies, builds the project, and deploys to Google App Engine. It triggers after a merge to thedevbranch.
Step 4: Configuring app.yaml
Ensure you have an app.yaml file in your project root that specifies the runtime and other configurations for App Engine.
Here is the app.yaml for the React app:
runtime: nodejs18
handlers:
# Serve all static files with url ending with a file extension
- url: /(.*\..+)$
  static_files: dist/\1
  upload: dist/(.*\..+)$
# Catch all handler to index.html
- url: /.*
  static_files: dist/index.html
  upload: dist/index.html

instance_class: F1
automatic_scaling:
  target_cpu_utilization: 0.65

entrypoint: npm start

env_variables:
  PORT: 5317
Here is a breakdown of each part:
runtime: nodejs18: Specifies that the runtime environment for the application is Node.js version 18.handlers: Defines URL patterns and how they should be served:The first handler
- url: /(.*\..+)$is a regex that matches any URL ending with a file extension. This means any request to a URL that looks like it's for a static file (likestyles.css,script.js,image.png, etc.) will be served from thedistdirectory where the static files are assumed to be compiled and stored.static_files: dist/\1andupload: dist/(.*\..+)$direct App Engine to serve the files from thedistdirectory and upload all files matching the given pattern when deploying.
The second handler
- url: /.*is a catch-all pattern that matches all other URLs and servesindex.htmlfrom thedistdirectory. This is typical for single-page applications (SPAs) that handle routing on the client side.
instance_class: F1: Specifies the instance class for the app. F1 is a specific class of machine that defines the amount of CPU and memory allocated to the instance.automatic_scaling: Defines the scaling behavior of the application.target_cpu_utilization: 0.65means that the app will scale to maintain a target CPU utilization of 65%.
entrypoint: The command that is executed to start the application, which in this case isnpm start.env_variables: Defines environment variables for the application.PORT: 5317specifies that the app should listen on port 5317.
The app.yaml configuration is important because it ensures that the React application is served efficiently on Google App Engine, with automatic scaling to handle varying loads, optimized caching for static assets, and basic security headers to enhance the security posture of the application.
Step 5: Writing the GitHub Action Workflow (Java App)
Create a .github/workflows/deploy.yml file in the root of your repository with the following content:
name: Deploy and Test Workflow

on:
  push:
   branches:
     - dev  # Triggers the workflow on push events to dev branch.
  pull_request:
    branches:
      - dev # Triggers the workflow on pull request events targeting dev branch.

jobs:
  test:
    # This job runs on pull_request events
    if: github.event_name == 'pull_request'
    runs-on: ubuntu-latest
    steps:
      - name: Checkout repository
        uses: actions/checkout@v3

      # Add steps for testing your java app
      - name: Run tests
        run: mvn clean install -DskipTests

  build_and_deploy:
    # This job runs on push events, specifically after PRs are merged into main
    # needs: test
    if: github.event_name == 'push'
    runs-on: ubuntu-latest
    steps:
      - name: Checkout repository
        uses: actions/checkout@v3

      - name: Set up Java
        uses: actions/setup-java@v2
        with:
          java-version: '17'
          distribution: 'adopt'

      - name: Set environment variables from secrets
        run: |
          echo "DB_URL=${{ secrets.DB_URL }}" >> $GITHUB_ENV
          echo "GOOGLE_HOST=${{ secrets.GOOGLE_HOST }}" >> $GITHUB_ENV
          echo "GOOGLE_USERNAME=${{ secrets.GOOGLE_USERNAME }}" >> $GITHUB_ENV
          echo "GOOGLE_PASSWORD=${{ secrets.GOOGLE_PASSWORD }}" >> $GITHUB_ENV
          echo "GOOGLE_PORT=${{ secrets.GOOGLE_PORT }}" >> $GITHUB_ENV
          echo "JWT_SECRET=${{ secrets.JWT_SECRET }}" >> $GITHUB_ENV
          echo "GOOGLE_CLIENT_ID=${{ secrets.GOOGLE_CLIENT_ID }}" >> $GITHUB_ENV

      - name: Setup Google Cloud CLI
        uses: google-github-actions/auth@v1
        with:
          project_id: ${{ secrets.GCP_PROJECT_ID }}
          credentials_json: ${{ secrets.GCP_SA_KEY }}
          export_default_credentials: true

      - name: Run tests
        run: mvn clean install -DskipTests

      - name: Build with Maven
        run: mvn spring-boot:run

      - name: Deploy to Google App Engine
        uses: google-github-actions/deploy-appengine@v0
        with:
          project_id: ${{ secrets.GCP_PROJECT_ID }}
          credentials: ${{ secrets.GCP_SA_KEY }}
          promote: true
          version: 'auto' # Automatically generate a version ID
          deliverables: target/APP-NAME-0.0.1-SNAPSHOT.jar # Update this to the path of your built JAR
Step 6: Configuring app.yaml (Java App)
Ensure you have an app.yaml file in your project root that specifies the runtime and other configurations for App Engine.
Here is the app.yaml for the Java app:
runtime: java17
env: standard
instance_class: F1  # Smallest instance for development to minimize costs.

automatic_scaling:  # Use automatic scaling for development to manage instances more flexibly.
  max_instances: 1  # Limit instances to minimize costs.
  min_idle_instances: 0  # Scale down to 0 instances when not in use.
  max_idle_instances: 1  # Limit to 1 to prevent cost from idle instances.
  max_concurrent_requests: 10  # Limit to prevent overuse by too many requests.

handlers:
  - url: .*
    script: auto

# Set environment-specific variables if needed.
env_variables:
  ENV: 'dev'
runtime: java17: This indicates the application is using Java 11 as the runtime environment.env: standard: The app will run in the Standard Environment, which is a preconfigured environment with a specific set of available languages and third-party libraries.instance_class: F1: This specifies the class of machine that the service will use. The F1 class is the smallest available instance type in App Engine, with the lowest amount of CPU and memory. It is a cost-effective option for a development environment where you don’t expect heavy traffic.automatic_scaling: This section configures how App Engine automatically adjusts the number of running instances based on the current load.max_instances: 1: Sets the maximum number of instances to 1. This means only one instance of the app will be running at any time, which is usually sufficient for development purposes.min_idle_instances: 0: Allows App Engine to scale down to 0 instances when there is no traffic, saving costs.max_idle_instances: 1: Limits the number of idle instances to 1 to minimize running costs for unused resources.max_concurrent_requests: 10: Limits the number of requests that an instance can process simultaneously to 10. This is a conservative limit that helps to avoid overloading the development instance.
handlers:- url: .*: This handler definition states that any URL (.*is a regular expression that matches any string) should be served by the application.script: auto: In the Java 11 runtime, this field is ignored since it is more relevant to runtimes like Python or PHP, where you map URLs to specific script files.
env_variables: This section is used to define environment variables that the application can access at runtime.ENV: 'dev': Sets an environment variableENVto the stringdev, which can be useful to alter behavior or settings when running in a development environment.
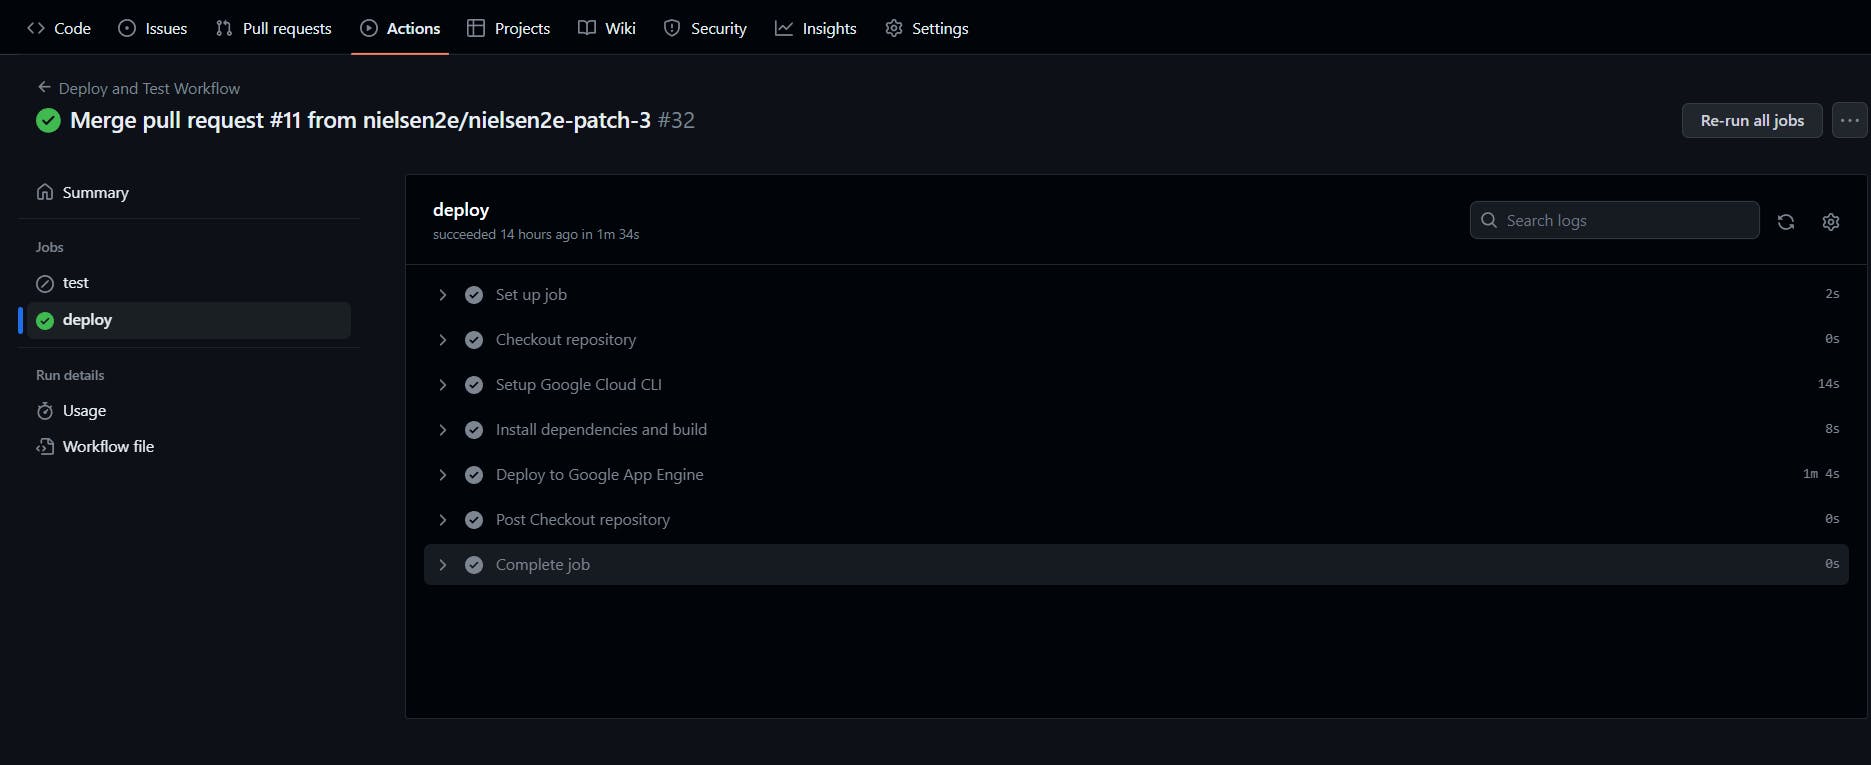
Step 5: Merging and Observing the Deployment
Once you merge your changes into the dev branch, the deploy job will start:
GitHub Actions checks out the latest code.
It sets up the Google Cloud CLI with the provided credentials.
The project dependencies are installed, and the build script is run.
If everything is successful, the application is deployed to Google App Engine.

Conclusion
GitHub Actions is easy and simple to use once you get a hang of some of its quirks, coupled with cloud serverless cloud offerings creating a CI/CD workflow is easy. With these steps completed, you should have a fully functional CI/CD pipeline that automatically deploys your React and Java application to Google App Engine using GitHub Actions.
References